A veces iniciamos sesión y el fondo de pantalla nos ha cambiado, nos han desaparecido varios iconos del escritorio y algunos valores vuelen a estar por defecto (por ejemplo, sonidos del sistema). Es síntoma de que el usuario está dañado.
Para recuperarlo:
Iniciar sesión con un usuario que no tenga problemas o en modo seguro.
Ingresa a ejecutar/escribes regedit
Ir a la ruta: HKEY_LOCAL_MACHINE\SOFTWARE\Microsoft\Windows NT\CurrentVersion\ProfileList
a medida q vayas pinchando las carpetas (identificadas como S-1-5-18; S-1-5-19) irá apareciendo el nombre del perfil en el valor ProfileImagePath.
Elimina la carpeta donde el ProfileImagePath es TEMP
Cambia el nombre de la carpeta que acaba en BAK, borrando la extenxión .BAK
Reiniciar
25 de noviembre de 2013
18 de noviembre de 2013
Youtube: mejorar la decarga
Paso 1: Añadir La Extensión Tampermonkey a Chrome.
Paso 2: Instalar el script a la Extensión Tampermonkey.
Ahora nos iremos al siguiente link donde nos mandara a la pagina Userscripts.com específicamente al script llamado:
Youtube Center
Daremos Clic en el botón que dice Install.
Desactivar la opción PLAYER --> Dash Playback
Paso 2: Instalar el script a la Extensión Tampermonkey.
Ahora nos iremos al siguiente link donde nos mandara a la pagina Userscripts.com específicamente al script llamado:
Youtube Center
Daremos Clic en el botón que dice Install.
Desactivar la opción PLAYER --> Dash Playback
28 de octubre de 2013
Clonar disco USB arrancable
Tomado de: http://www.auyanet.net/?p=13124
Para realizar la clonación primero hay que crear una imagen .bin del Pendrive origen para después grabarla al de su destino.
Para iniciar el proceso Abra PassMark ImageUSB y siga los pasos enumerados en la siguiente imagen.

Paso 1: Seleccione el Pendrive de origen para crear una imagen exacta.
Paso 2: Marque Create From UFD, opción para crear la imagen en vez de grabarla.
Paso 3: Seleccione un ruta de destino y añada un nombre para localizar el archivo .bin.
Paso 4: Haga click en el botón “Create Image” para inicializar el proceso de creación.
2- Para grabar la imagen de clonación tan solo tiene que introducir el Pendrive de destino y en el “Paso 2″anterior marcar “Write to UFD” en vez de Create from UFD.
1 de octubre de 2013
Kaspersky: analísis del archivo sysinfo
Visitar: http://www.getsysteminfo.com/index.php
Crear cuenta y analizar.
Crear cuenta y analizar.
1 de septiembre de 2013
Samsung S4 mini GT-I9195 ROOTEAR Y DESROOTEAR
Fuente: http://lionking853.blogspot.com.es/2013/08/how-to-root-unroot-samsung-galaxy-s4.html

Hello Fandroid, this is a step by step tutorial to show Rooting and Unrooting of Samsung Galaxy S4 Mini I9190 & I9195. This tutorial show you a safe method to root and unroot your S4 Mini I9190 & I9195 without a data loss and without harming your device unless you will do something wrong during following my instructions. Dont use rooting to pirate applications and games, only use it for productive work. I am showing you this tutorial, because lot of people are worried about the S4 storage and want to transfer games in to their external sd card to play games and as well as they want to connect a PS3 controller with their S4. However rooting helps you to overclock CPU speed as well as many other things. But to keep it simple stay with the basics.
To Root your S4 I9190 and I9195 using this tutorial you need two things :
1. Samsung Kies: http://www.samsung.com/uk/support/usefulsoftware/KIES/JSP
Download a Samsung Kies from a Samsung Official Website directly to make sure you have correct drivers installed in your computer for your S4 Mini I9190 & I9195. Make sure you are downloading a correct Clock Work Recovery Mode from below links as I9195 and I9190 have different Clock Work Recovery Mode
2. Odin Software for rooting and installing Clock Work Recovery Mode (CWRM) your S4 I9190:
http://www.putlocker.com/file/B64F21150DECAF41
Odin Software for rooting and installing Clock Work Recovery Mode (CWRM) your S4 I9195:
http://www.putlocker.com/file/1BADE281978D40B6

You need to download this file because it will root your S4 I9190 and I9195. This is a winrar file so extract it using winrar on your pc and you will see 3 files after extracting it like a below picture.

STEP 1:
Now once you have installed a Samsung Kies and open it with your S4 Mini connected with your computer, it will automatically detect your phone and install all the necessary hardware of your phone in your computer. When you connect your phone with your pc it will look like a below picture in Samsung Kies.

After doing this step, make sure you have closed down a Samsung Kies and save GT-I9190-RootKit-v2 which you have in your downloaded rooting folder (Please note you dont have to extract this file just copy and paste zip file to your phone sd card or else on external sd card.
STEP 2:
Now you have to open ODIN Folder and you have to press a file which is Odin3 (Run as Administrator and make sure your phone is disconnected from computer). After opening it you will see a window like below picture.


Its very easy to Unroot Samsung Galaxy 4 I9190 I9195 after rooting it. Make sure you have installed proper drivers by installing Kies on your PC. If you have followed my steps to root your device, you must have all the drivers installed by now. If you have not did rooting by looking at the above tutorial, then just have a quick go at Rooting process (Step 1). To unroot S4 I9190 I9195 you need three things which are going to take little bit longer than rooting your phone.
1. Download a firmware for Samsung Galaxy S4 I9190 from sam mobile site:
http://www.sammobile.com/firmwares/1/
Download a firmware for Samsung Galaxy S4 I9195 from sam mobile site
http://www.sammobile.com/firmwares/1/
When you press the above link you will see a window like a below picture to download a S4 Mini firmware.


How To Root & Unroot Samsung Galaxy S4 Mini I9190 & I9195 In Easy Way

Hello Fandroid, this is a step by step tutorial to show Rooting and Unrooting of Samsung Galaxy S4 Mini I9190 & I9195. This tutorial show you a safe method to root and unroot your S4 Mini I9190 & I9195 without a data loss and without harming your device unless you will do something wrong during following my instructions. Dont use rooting to pirate applications and games, only use it for productive work. I am showing you this tutorial, because lot of people are worried about the S4 storage and want to transfer games in to their external sd card to play games and as well as they want to connect a PS3 controller with their S4. However rooting helps you to overclock CPU speed as well as many other things. But to keep it simple stay with the basics.
To Root your S4 I9190 and I9195 using this tutorial you need two things :
1. Samsung Kies: http://www.samsung.com/uk/support/usefulsoftware/KIES/JSP
Download a Samsung Kies from a Samsung Official Website directly to make sure you have correct drivers installed in your computer for your S4 Mini I9190 & I9195. Make sure you are downloading a correct Clock Work Recovery Mode from below links as I9195 and I9190 have different Clock Work Recovery Mode
2. Odin Software for rooting and installing Clock Work Recovery Mode (CWRM) your S4 I9190:
http://www.putlocker.com/file/B64F21150DECAF41
Odin Software for rooting and installing Clock Work Recovery Mode (CWRM) your S4 I9195:
http://www.putlocker.com/file/1BADE281978D40B6

You need to download this file because it will root your S4 I9190 and I9195. This is a winrar file so extract it using winrar on your pc and you will see 3 files after extracting it like a below picture.

STEP 1:
Now once you have installed a Samsung Kies and open it with your S4 Mini connected with your computer, it will automatically detect your phone and install all the necessary hardware of your phone in your computer. When you connect your phone with your pc it will look like a below picture in Samsung Kies.

After doing this step, make sure you have closed down a Samsung Kies and save GT-I9190-RootKit-v2 which you have in your downloaded rooting folder (Please note you dont have to extract this file just copy and paste zip file to your phone sd card or else on external sd card.
STEP 2:
Now you have to open ODIN Folder and you have to press a file which is Odin3 (Run as Administrator and make sure your phone is disconnected from computer). After opening it you will see a window like below picture.

After opening
this Odin file you have to turn off your S4 I9190 and I9195 by pressing
power on and off key and when its get completley off
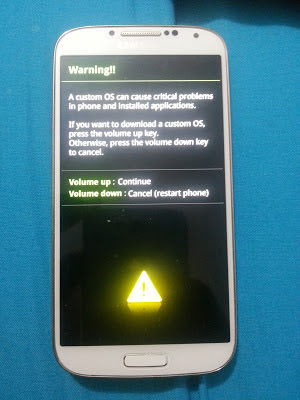
PRESS (POWER ON AND OFF KEY + HOME BUTTON + VOLUME DOWN KEY AT THE SAME
TIME). This will get you in to a downloading mode like a below picture
in your phone.

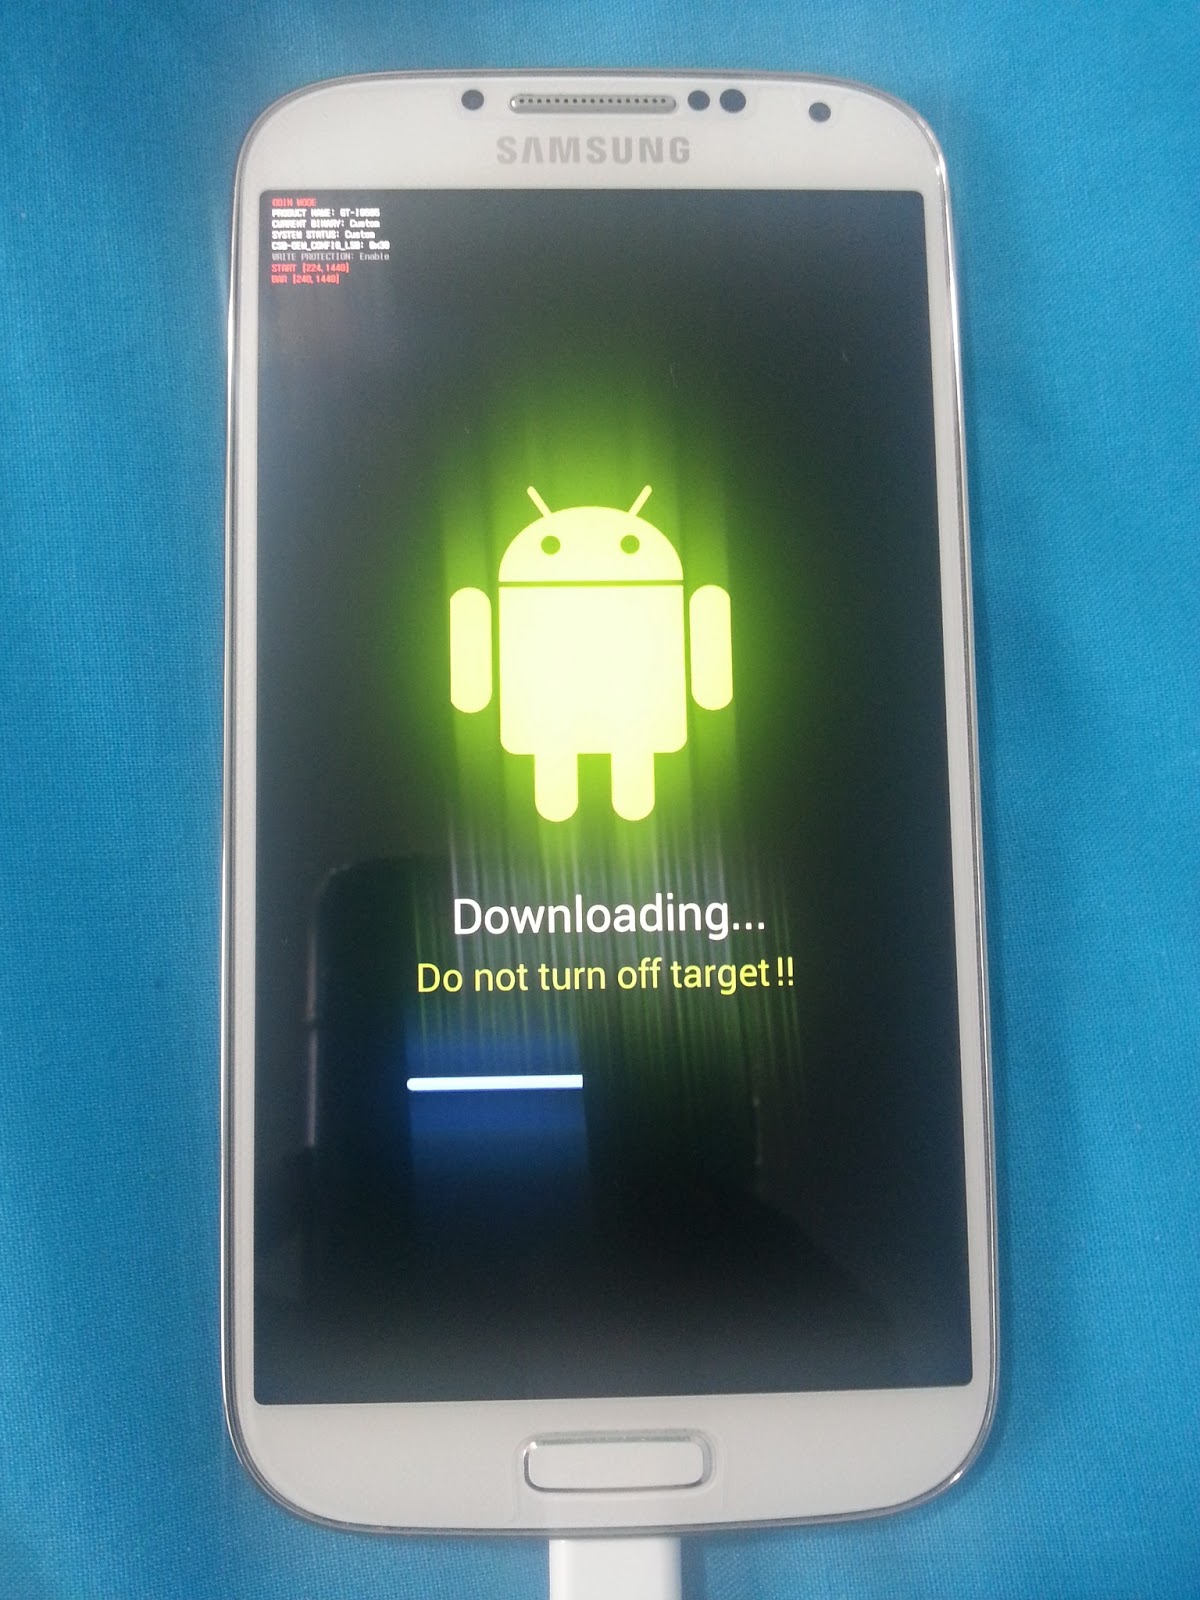
After getting in to a downloading mode you have to press a UP VOLUME KEY ON YOUR PHONE and you will see a window like below picture on your phone

Now when you see a above window connect your S4 I9190 or I9195 with your pc through micro usb lead and you will see a below picture like window on your PC

Here you can witness that Odin (Id-com) section has become blue in above picture. Now you have to press PDA in
Odin and you have to search for a
file recovery-clockwork-6.0.3.7-serrano3gxx.tar for I9190
and recovery-clockwork-6.0.3.7-serranoltexx.tar for I9195 which is in your downloaded S4 Mini rooting folder. Look at below picture to see how this file looks like.

Now double tap on the file it will be added to Odin and press Start in
Odin =and leave your phone as it is. After starting a process you will
see a window like below picture in your phone with downloading bar

In your PC you will see a picture like below in Odin

Green Box will be highlighted in Odin just above the blue box which illustrates that you have did all the things correct. Now
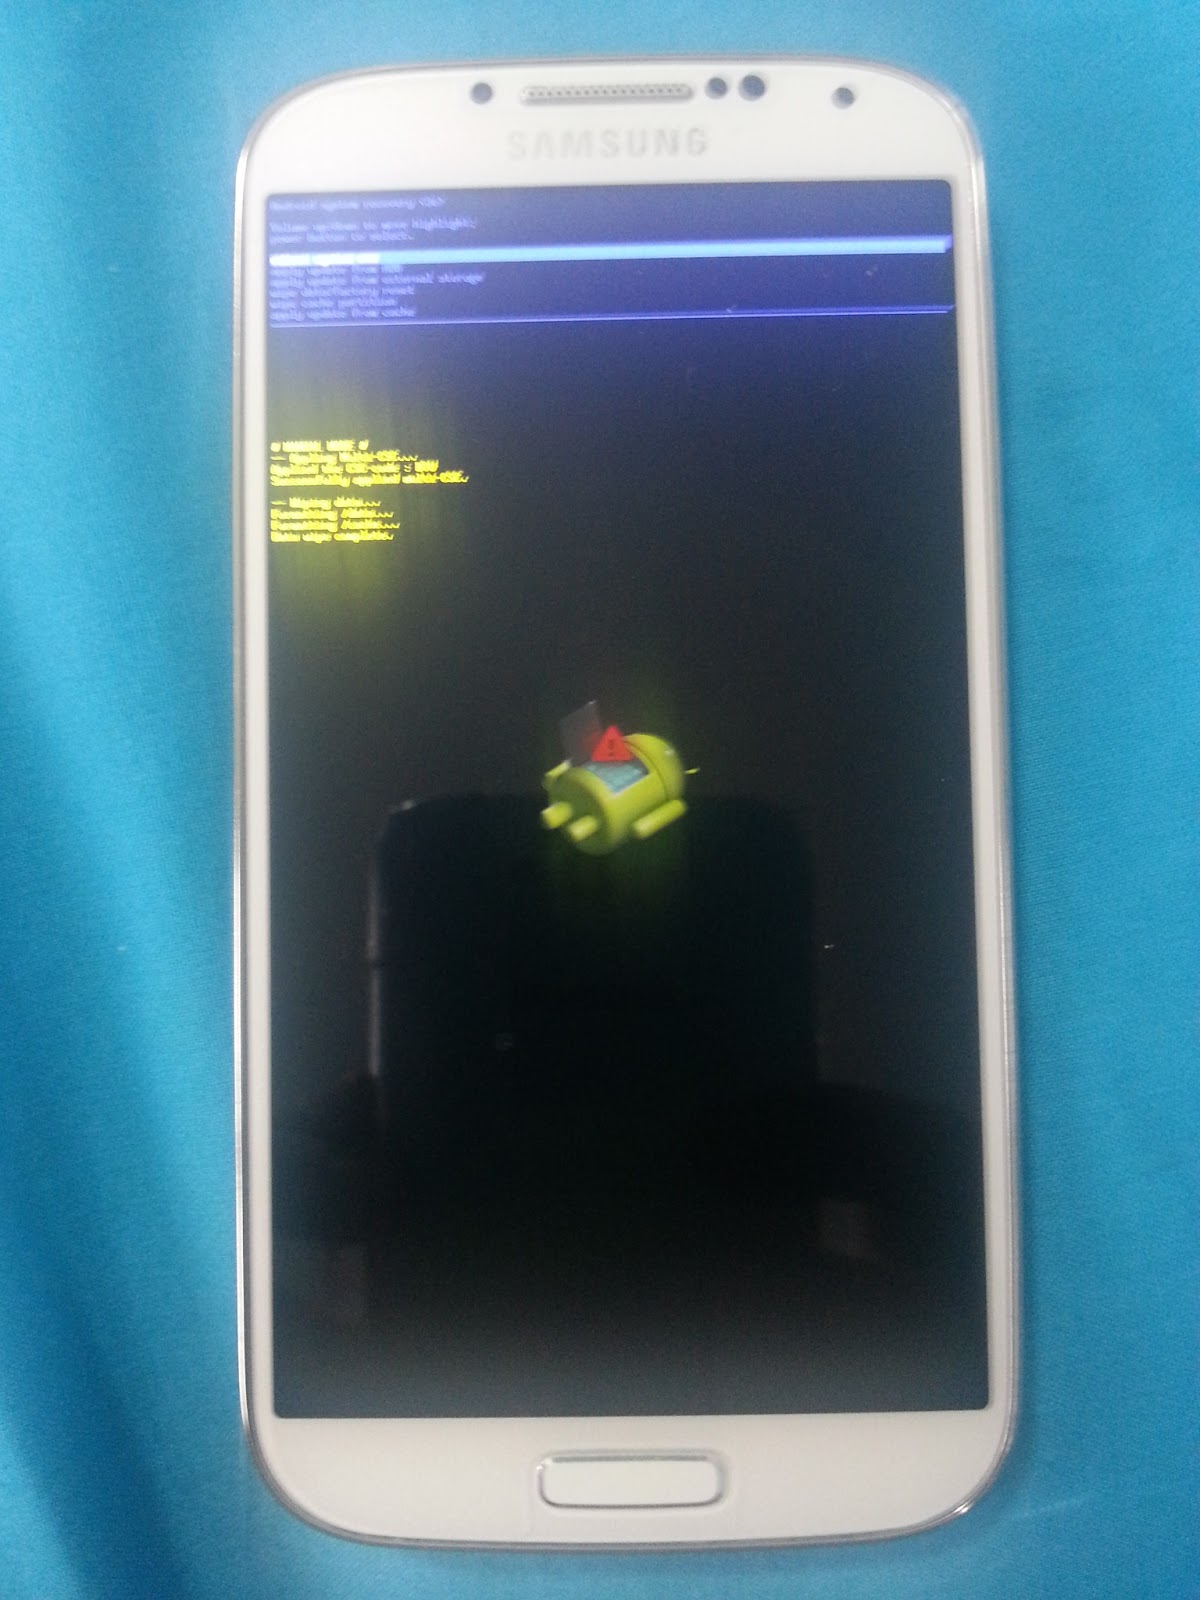
during this process your mobile will get reset and when it vibrates
Hold Home Button and Volume UP button at the same time to enter in CWMR
which looks like a below picture. If you have forget to do that and want
to get into CWMR , power off your device and press POWER ON AND OFF
KEY + HOME BUTTON + VOLUME UP KEY at the same time when you see S4 logo
release Power On and Off key but keep on Holding Home Button and Volume
Up key until you get in CWMR.

Now here you
have to select a Install Zip option which you can see on above picture
using a down volume key and then press home button to select it. Now
when you press Install Zip you will see a picture like below picture
and here you have select ( choose zip from sd card) if you have save
your GT-I9190-RootKit-v2
to sd card or else if you have saved in external sd card use down
volume key to select external sd card. In this case i have chosen sd
card because i have saved GT-I9190-RootKit-v2 in sd card.

Now you will see another window like below picture and here you have to select 0/ by pressing home button

Now
after pressing 0/ you will see a list of folders that you have on you
internal memory or you can say sd card and here you have to select a
folder where you have saved GT-I9190-RootKit-v2. In a below picture i have saved it in Download Folder and i select it by pressing Home button

Now here you will see GT-I9190-RootKit-v2 inside download folder press home button to begin rooting your device like a below picture

Now Once you select GT-I9190-RootKit-v2 you see a window like below picture and you have to select Yes here

Now you will get proceeding like below picture

Once you see
complete msg press back button key on you S4 Mini and reboot system and
after rebooting your system you will a below type of msg on your S4
MINI.

You have successfully installed Super Su on your S4 Mini with CWRM and ready to flash any rom or kernal.

HOW TO UNROOT
Its very easy to Unroot Samsung Galaxy 4 I9190 I9195 after rooting it. Make sure you have installed proper drivers by installing Kies on your PC. If you have followed my steps to root your device, you must have all the drivers installed by now. If you have not did rooting by looking at the above tutorial, then just have a quick go at Rooting process (Step 1). To unroot S4 I9190 I9195 you need three things which are going to take little bit longer than rooting your phone.
1. Download a firmware for Samsung Galaxy S4 I9190 from sam mobile site:
http://www.sammobile.com/firmwares/1/
Download a firmware for Samsung Galaxy S4 I9195 from sam mobile site
http://www.sammobile.com/firmwares/1/
When you press the above link you will see a window like a below picture to download a S4 Mini firmware.

This
site needs registration, but registration is free and after that you
can download a firmware. This file is going to take a little bit more
time to download because file size is around 950mb
After
downloading a file you have to extract it using a winrar and after
extracting it you will find two files inside a folder like below picture

Now after extracting firmware open Odin again

Now shut down your mobile and when its get completely off Press Power On Key + Home Button + Down Volume key at the same time to get into a downloading mode like below picture on your phone
Now here you have to press Up Volume Key to continue and you will be entered in a window like below picture
Now connect
your phone with PC and open Odin in your PC (Run as Administrator) and
Odin first box will go sky blue like a below picture, if you have
successfully installed all the drivers. Make sure that Samsung Kies is
not running in your PC.

Now press PDA to find out your downloaded S4 I9190 Firmware which you have downloaded from Sam mobile (make
sure you have extracted the file using winrar). Your firmware should be
look like a below picture on your PC. Make sure only two things are
ticked in Odin: Auto Reboot and F. Reset Time like a below picture when you add a firmware to ODIN.

Now
press start and if Odin gives you a message dont responding like a
below picture now worries because its going to respond after taking its
time

Now when its start responding you will see a below like picture on your Pc and Phone, dont touch anything now

After
all the downloading process get complete you will see a picture like
below in your PC and your phone will be restarted automatically.

Now you have to
make a backup of your files using Samsung Kies, so you will not loose
your internal storage files, if you have saved all the things in your
external sd card no worries. After making a backup, power off your phone
and Press Power Key + Up Volume Key + Home Button at the same time and
you will see a below like picture on your phone.

Now here from down volume key go to wipe data/ factory reset and press power button. Now you will see a below like picture

Now use down volume key again and select Yes--delete user data by pressing power button
and below picture like window comes up and here you have to press reboot system now by pressing power key. Now
reboot will take little bit longer because we are installing a
firmware. Thats it you have successfully unrooted your device, claim
your warranty or else sell your phone if you want to :).
11 de julio de 2013
Joomla: error codificación de contenido
Si les llega a suceder en Joomla (o Mambo) el siguiente error:
Error de codificación de contenidoLa solución es deshabilitar la compresión de las páginas con gZip, entonces en el archivo de configuration.php buscamos la linea $gzip y le ponemos valor 0.
La página que intentas ver no puede mostrarse porque usa una forma de compresión no válida o admitida.
Contacta a los propietarios del sitio web para informarles sobre este problema.
public $gzip = ’0′;Listo!! reiniciamos la página web de joomla y todo normal.
10 de julio de 2013
JOOMLA: quitar encabezado y pie ruso en vista de impresión
Editar el archivo templates/it_university2/html/com_content/article/default.php
Buscar el texto "base64_decode"
Comentar las líneas de código que tienen ese texto.
Buscar el texto "base64_decode"
Comentar las líneas de código que tienen ese texto.
Acceso a la configuración avanzada del router ADB
Movistar distribuye unos router parecidos físicamente a los ASL, pero son los ADB. Se accede a la configuración a través de:
http://10.0.0.3/main.html
No olvidarse de teclear http
http://10.0.0.3/main.html
No olvidarse de teclear http
JOOMLA: añadir todas las imágenes de una categoría de joomgallery a la cesta de descargas
Editar el archivo:
components/com_joomgallery/views/category/tmpl/default_head.php
Y añadir en la línea 2:
<div class="jg_headerfavourites_icon">
<?php if($this->params->get('show_headerfavourites_icon') == 1): ?>
<a href="<?php echo JRoute::_('index.php?task=favourites.addimages&catid='.$this->category->cid); ?>"<?php echo JHTML::_('joomgallery.tip', 'COM_JOOMGALLERY_COMMON_FAVOURITES_ADD_IMAGES_TIPTEXT', 'COM_JOOMGALLERY_COMMON_FAVOURITES_ADD_IMAGES_TIPCAPTION', true); ?>>
<?php echo 'Añadir1'.JHTML::_('joomgallery.icon', 'star.png', 'COM_JOOMGALLERY_COMMON_FAVOURITES_ADD_IMAGES_TIPCAPTION'); ?></a>
<?php endif;
if($this->params->get('show_headerfavourites_icon') == 2): ?>
<a href="<?php echo JRoute::_('index.php?task=favourites.addimages&catid='.$this->category->cid); ?>"<?php echo JHTML::_('joomgallery.tip', 'COM_JOOMGALLERY_COMMON_DOWNLOADZIP_ADD_IMAGES_TIPTEXT', 'COM_JOOMGALLERY_COMMON_DOWNLOADZIP_ADD_IMAGES_TIPCAPTION', true); ?>>
<?php echo 'Añadir todas las imágenes de esta categoría a la cesta de descargas'.JHTML::_('joomgallery.icon', 'basket_put.png', 'COM_JOOMGALLERY_COMMON_DOWNLOADZIP_ADD_IMAGES_TIPCAPTION'); ?></a>
<?php endif;
if($this->params->get('show_headerfavourites_icon') == -1): ?>
<span<?php echo JHTML::_('joomgallery.tip', 'COM_JOOMGALLERY_COMMON_FAVOURITES_ADD_IMAGES_NOT_ALLOWED_TIPTEXT', 'COM_JOOMGALLERY_COMMON_FAVOURITES_ADD_IMAGES_TIPCAPTION', true); ?>>
<?php echo 'Añadir3'.JHTML::_('joomgallery.icon', 'star_gr.png', 'COM_JOOMGALLERY_COMMON_FAVOURITES_ADD_IMAGES_TIPCAPTION'); ?>
</span>
<?php endif;
if($this->params->get('show_headerfavourites_icon') == -2): ?>
<span<?php echo JHTML::_('joomgallery.tip', 'COM_JOOMGALLERY_COMMON_DOWNLOADZIP_ADD_IMAGES_NOT_ALLOWED_TIPTEXT', 'COM_JOOMGALLERY_COMMON_DOWNLOADZIP_ADD_IMAGES_TIPCAPTION', true); ?>>
<?php echo 'Añadir4'.JHTML::_('joomgallery.icon', 'basket_put_gr.png', 'COM_JOOMGALLERY_COMMON_DOWNLOADZIP_ADD_IMAGES_TIPCAPTION'); ?>
</span>
<?php endif; ?>
</div> <br />
28 de junio de 2013
Flash responsivo
We recommend not to use flash (swf) in Joomla 3, because Flash is not
supported in many mobile devices. If you nevertheless want to use Flash
this is a technique to create responsive flash objects.
Flash code
The w3C flasshcode is without "embed". Create 2 divs's around the flash object, each with a unique class.
CSS
The outer div (=div.objectcontainer) has a width of 1000% and a max-width of the original flash object (375px).
The inner div (=div.objectwrapper) has a height of 0, a position relative and a bottom padding of a percentage height/width (=241 / 375 *100% = 64.26666667%).
With this CSS the flash object is responsive and will be proportionallly redoced in size less than 375px.
Flash code
The w3C flasshcode is without "embed". Create 2 divs's around the flash object, each with a unique class.
1
2
3
4
5
6
7
8
9
10
11
12
13
14
| <div class="objectcontainer"> <div class="objectwrapper"> <object width="375" height="241" data="images/CIAA_Model.swf" type="application/x-shockwave-flash"> <param name="quality" value="best" /> <param name="wmode" value="opaque" /> <param name="base" value="/joomlacss/" /> <param name="src" value="images/CIAA_Model.swf" /> </object> </div></div> |
CSS
1
2
3
4
5
6
7
8
9
10
11
12
13
14
15
16
| div.objectcontainer { max-width: 375px; width: 100%;}div.objectcontainer div.objectwrapper { height: 0; padding: 0 0 64.26666667% 0; position: relative;}div.objectwrapper object { height: 100%; left: 0; position: absolute; top: 0; width: 100%;} |
The outer div (=div.objectcontainer) has a width of 1000% and a max-width of the original flash object (375px).
The inner div (=div.objectwrapper) has a height of 0, a position relative and a bottom padding of a percentage height/width (=241 / 375 *100% = 64.26666667%).
With this CSS the flash object is responsive and will be proportionallly redoced in size less than 375px.
12 de mayo de 2013
SERVICIOS DE WINDOWS
La mejor web sobre servicios de windows:
http://www.blackviper.com/service-configurations/black-vipers-windows-7-service-pack-1-service-configurations/
http://www.blackviper.com/service-configurations/black-vipers-windows-7-service-pack-1-service-configurations/
18 de abril de 2013
Valores configuración routers
Para que no haya problemas en la red:
IGMP snooping: OFF
QoS: ON
UpnP: OFF
RIP: OFF
IGMP snooping: OFF
QoS: ON
UpnP: OFF
RIP: OFF
12 de marzo de 2013
WIFI: unos ordenadores detectan la señal y otros no
Una de las posibles causas es el parámetro del router que determina los milisegundos en el intervalo de la señal. Probar con un valor de 10 milisegundos e ir aumentando hasta conseguir buena conectividad. Valor máximo 1000.
8 de marzo de 2013
JOOMLA: INSERTAR PDF EN UN ARTÍCULO
<object width="640" height="480" type="application/pdf" data="images/document.pdf">

<param name="movie" value="images/document.pdf" />

</object>
22 de febrero de 2013
JOOMLA: refrescar o actualizar una imagen automáticamente
- <!DOCTYPE HTML PUBLIC "-//W3C//DTD HTML 4.01 Transitional//EN">
- <html>
- <head>
- <title>Mi webcam</title>
- </head>
- <body>
- <img name="oImg" id="oImg" src="http://camaras.dominio.com/Camaras/oImg.jpg" width="800" height="600" border="0"/>
- <script language="JavaScript" type="text/javascript" >
- periodo = 1; // segundos entre recargas
- imgoImg=document.getElementById("oImg");
- imgsrc = imgoImg.src;
- buffer = new Image();
- buffer.onload = imageChange;
- buffer.onerror = imageError;
- setTimeout("imageReload()", periodo * 1000);
- function imageReload() {
- buffer.src = imgsrc + "?d=" + new Date().getTime();
- setTimeout("imageReload()", periodo * 1000);
- }
- function imageChange() {
- imgoImg.src = buffer.src;
- }
- function imageError() {
- setTimeout("imageReload()", 1000);
- }
- </script>
- </body>
- </html>
8 de febrero de 2013
Significado de TTL al hacer un ping
El Tiempo de Vida o Time To Live (TTL) es un concepto usado en redes
para indicar por cuántos nodos puede pasar un paquete antes de ser
descartado por la red o devuelto a su origen.
El TTL como tal es un campo en la estructura del paquete del protocolo IP. Sin este campo, paquetes enviados a traves de rutas no existentes, o a direcciones erróneas, estarían vagando por la red de manera infinita, utilizando ancho de banda sin una razón positiva.
El valor óptimo para aprovechar el rendimiento en Internet es de 128, no 255.
27 de enero de 2013
EXCEL: copiar celdas sin cambiar las referencias en las fórmulas
Con el programa en versión gratuita ASAP Utilities
22 de enero de 2013
Añadir elementos al menú "Enviar a"
En windows vista y windows 7, para añadir elementos al menú contextual "Enviar a":
- Buscar "shell:sendto"
Abrir esa carpeta y copiar-pegar los acceso directos a las ubicaciones que nos interesen.
- Buscar "shell:sendto"
Abrir esa carpeta y copiar-pegar los acceso directos a las ubicaciones que nos interesen.
21 de enero de 2013
JOOMLA: error AutoTweet NG Plugin - getData not implemented by plugin
Si tras instalar en joomla el autotweet se muestra un mensaje de error en el frontend:
AutoTweet NG Plugin - getData not implemented by plugin
Hay que comprobar en la tabla de datos si existe en la tabla _autotweet_queue el campo native_object
En caso de que no exista, ejecutar la siguiente orden SQL:
ALTER TABLE `jit_autotweet_queue` ADD `native_object` TEXT NULL COMMENT 'To save the native component object, and avoid later component app instantiation';
16 de enero de 2013
Sincronizar outlook y gmail: mensajes, contactos y calendario
Sacado de: http://www.tuexpertoit.com/2011/05/14/como-sincronizar-outlook-y-gmail-compartir-correos-contactos-y-calendario-en-outlook/
Cómo sincronizar la cuenta de correo de Gmail con Outlook
En primer lugar, para empezar la sincronización de la cuenta de correo de Gmail con el Outlook hay que ir a la configuración de la cuenta de Gmail (dentro de la bandeja de entrada del correo pinchamos en la parte superior derecha de la pantalla donde aparece nuestra dirección de correo, después configuración de cuenta y de nuevo pinchar en configuración dentro del menú “Mis productos”).
Una vez dentro, nos acercamos a la pestaña “Reenvío y correo POP/IMAP” y revisamos que la opción “Habilitar IMAP” esté activada. Guardamos los cambios y luego vamos al Outlook (la versión utilizada para este tutorial fue el Outlook 2010). Dentro del programa vamos a las opciones de configuración de la cuenta en el menú y añadimos una nueva cuenta. Introducimos la cuenta de correo del Gmail y luego es importante en el siguiente paso hacer click en “configurar manualmente la configuración del servidor”. Pinchamos sobre más opciones de configuración, avanzado, el servidor entrante tiene que tener el valor 933 con encriptación SSL y el servidor de salida 587 con la encriptación TLS.
Ya está. En el caso de utilizar Thunderbird se puede conseguir lo mismo siguiendo el mismo proceso.

Cómo sincronizar los contactos de Gmail con Outlook
Para este paso, vamos a necesitar una herramienta intermedia que nos ayude a realizar la sincronización de contactos entre Gmail y Outlook. Una de ellas, que además es gratuita, es Soocial. Basta con registrarnos en la página web de Soocial con la cuenta de correo de Gmail (pedirá confirmación de la cuenta a través de un e-mail). Luego pinchamos sobre “Add Gmail” y concedemos el permiso para conectar con la cuenta de correo. Pulsamos sobre la opción “Merge Gmail with Soocial” y luego el proceso se realiza en segundo plano.
Una vez realizado este paso, vamos al menú de conexiones y añadimos una cuenta de Outlook (“Add Outlook”). Incorporar los contactos de Outlook es más complicado, ya que hay bajarse un programa llamado “Outlook Sync Client” . Tras el proceso de instalación (un tanto pesado) abrimos el programa, que seguramente aparecerá en la barra de tareas, y tras introducir nuestros datos de registro en Soocial apretamos al botón “Sync now”. Todos los contactos de Gmail aparecerán en la lista de contactos de Outlook.

Cómo sincronizar el calendario de Gmail con Outlook
Para realizar este paso hay que descargarse la aplicación Google Calendar Sync. Una vez instalada entras tus datos de Google y eliges sincronizar tus calendarios en dos vías, lo que te permite sincronizar tus calendarios cada vez que los cambies tanto en Outlook como en Gmail.
Cómo sincronizar la cuenta de correo de Gmail con Outlook
En primer lugar, para empezar la sincronización de la cuenta de correo de Gmail con el Outlook hay que ir a la configuración de la cuenta de Gmail (dentro de la bandeja de entrada del correo pinchamos en la parte superior derecha de la pantalla donde aparece nuestra dirección de correo, después configuración de cuenta y de nuevo pinchar en configuración dentro del menú “Mis productos”).
Una vez dentro, nos acercamos a la pestaña “Reenvío y correo POP/IMAP” y revisamos que la opción “Habilitar IMAP” esté activada. Guardamos los cambios y luego vamos al Outlook (la versión utilizada para este tutorial fue el Outlook 2010). Dentro del programa vamos a las opciones de configuración de la cuenta en el menú y añadimos una nueva cuenta. Introducimos la cuenta de correo del Gmail y luego es importante en el siguiente paso hacer click en “configurar manualmente la configuración del servidor”. Pinchamos sobre más opciones de configuración, avanzado, el servidor entrante tiene que tener el valor 933 con encriptación SSL y el servidor de salida 587 con la encriptación TLS.
Ya está. En el caso de utilizar Thunderbird se puede conseguir lo mismo siguiendo el mismo proceso.
Cómo sincronizar los contactos de Gmail con Outlook
Para este paso, vamos a necesitar una herramienta intermedia que nos ayude a realizar la sincronización de contactos entre Gmail y Outlook. Una de ellas, que además es gratuita, es Soocial. Basta con registrarnos en la página web de Soocial con la cuenta de correo de Gmail (pedirá confirmación de la cuenta a través de un e-mail). Luego pinchamos sobre “Add Gmail” y concedemos el permiso para conectar con la cuenta de correo. Pulsamos sobre la opción “Merge Gmail with Soocial” y luego el proceso se realiza en segundo plano.
Una vez realizado este paso, vamos al menú de conexiones y añadimos una cuenta de Outlook (“Add Outlook”). Incorporar los contactos de Outlook es más complicado, ya que hay bajarse un programa llamado “Outlook Sync Client” . Tras el proceso de instalación (un tanto pesado) abrimos el programa, que seguramente aparecerá en la barra de tareas, y tras introducir nuestros datos de registro en Soocial apretamos al botón “Sync now”. Todos los contactos de Gmail aparecerán en la lista de contactos de Outlook.
Cómo sincronizar el calendario de Gmail con Outlook
Para realizar este paso hay que descargarse la aplicación Google Calendar Sync. Una vez instalada entras tus datos de Google y eliges sincronizar tus calendarios en dos vías, lo que te permite sincronizar tus calendarios cada vez que los cambies tanto en Outlook como en Gmail.
Migrar de outlook a gmail
Usar la utilidad de google: google apps migration for microsoft outlook
OJO: sólo funciona con cuentas de correo google apps
OJO: sólo funciona con cuentas de correo google apps
10 de enero de 2013
CAMBIAR FLUORESCENTES POR TUBOS LED
Para sustituir tubos fluorescentes de 1500mm / 58W :
- Tubo LED de 18-20W para vías de paso. Pasillos, zonas comunes de viviendas, garajes…
- Tubo LED de 22-30W para aulas, salas, habitaciones…
Los tubos fluorescentes convencionales necesitan
equipos para poder encenderse:
-
Con Reactancia y cebador.


- O con Balasto electrónico:


En cambio los tubos de LEDs no necesitan estos equipos.
Para cambiar por tubos LED:
- Si llevan reactancia y cebador, únicamente hay que cambiar
el cebador por un cebador LED y el tubo fluorescente por un tubo LED.
- Si llevan balastro, anular la reactancia y conectar la FASE
y el NEUTRO en las patillas de un extremo del tubo LED que pone AC INPUT o
ENTRADA AC.
Las principales ventajas de los LEDs frente a los fluorescentes son significativas:
- Horas de vida: Los tubos LED duran más de 50.000 horas, frente a las 10.000 de un buen tubo fluorescente
- Resistencia: Los tubos de LED pueden aguantar mucho más los golpes o vibraciones que los tubos fluorescentes. De hecho son desmontables y reparables, algo que para los tubos fluorescentes es impensable.
- Consumo: Los tubos LEDs consumen bastante menos que los tubos fluorescentes. Un tubo fluorescente de 600mm-18W con reactancia y cebador puede llegar a consumir el doble de su potencia nominal debido a la reactancia. Estamos hablando de un consumo de 36W frente a los 8 ó 10 W del consumo del tubo LED de 600mm.
- Arrancadas: Los tubos LED son de arranque instantáneo y no les afecta a sus horas de vida. En cambia un tubo fluorescente tarda en arrancar y el nº de encendidos diarios afecta a su vida. Por ejemplo muchos fabricantes de tubos fluorescentes estiman la vida del tubo, 10.000 horas, teniendo en cuenta únicamente 2 encendidos al día.
- Medio ambiente: Los tubos LED no necesitan de ningún gas para encenderse, los tubos fluorescentes están fabricados con vapor de mercurio y los compuestos de mercurio, son productos químicos altamente peligrosos para la salud humana y el medio ambiente.
La mayor desventaja de los LEDs es el ángulo de apertura que está limitado a 120º frente a los tubos fluorescentes que es de 360º. Si por ejemplo la luminaria está instalada en una pared lateral y queremos iluminar el suelo deberíamos orientar los tubos LEDs hacia el suelo o sino la luz se va a dirigir más hacia la pared contraria.
Suscribirse a:
Entradas (Atom)